

Bypassing the solenoid helps start a mower with ignition problems, but it’s a temporary solution. Diagnose and address the root cause for a more lasting fix. Learn why your mower relies on solenoid jumping and gain insights into troubleshooting and resolving the underlying issue.
Understanding the Function of a Lawn Mower Starter Solenoid
Prior to delving into the origins of the problem and potential resolutions, it’s crucial to grasp the functioning of a starter solenoid. Comprehending its operation aids in gaining insight into the issues affecting your machine.
The ignition button activates the starter system in your lawnmower. A crucial part of this system is the solenoid, transmitting current from the battery to the engine.
Upon starting, the battery initiates an electrical flow to the solenoid, which then amplifies it for the starter motor. Any malfunction here can prevent your mower from starting.
Despite a faulty solenoid, you can still start the machine by jumping it, bypassing the solenoid and delivering the necessary signal to the engine through an alternative method.
Why Does My Lawn Mower Only Starts When I Jump Solenoid?
Several factors may lead to your mower starting only when you jump the solenoid, with the primary culprit often being solenoid-related problems. Other potential issues involve ignition system faults, terminal problems, or issues with the control cable.
This segment provides an in-depth examination of these causes and offers potential solutions.
1. Faulty Solenoid
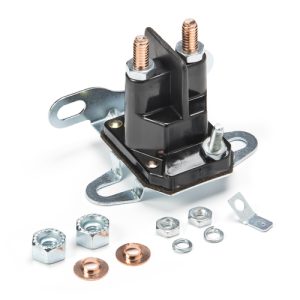
As stated, the starter solenoid directs current from the battery to the engine. Typically, mowers feature a square or round 3 or 4-post solenoid for operation. However, both solenoid types commonly face a similar issue.
Most solenoids incorporate an electromagnet to close the circuit between the battery and the solenoid. Over time, the electromagnet may weaken, causing functionality issues. Alternatively, continuous plunging can lead to wear and jamming. To identify a faulty solenoid, check other components; if they’re all functioning well, the issue likely lies with the solenoid.
Fixing a Lawnmower’s Solenoid Issues: A Step-by-Step Guide
Locating the solenoid is crucial for any action. Consult your owner’s manual or trace the positive battery wire, as it directly connects to the solenoid.
Upon finding the solenoid, proceed to address any faults. Repairing is uncommon; replacement is typically required. Follow these steps to replace the lawnmower solenoid.
- Disable your lawnmower’s ignition and uncover the battery area. Use a socket wrench to loosen solenoid cable nuts.
- Unbolt the solenoid from the mower’s frame.
- Take a photo of connections before removing the solenoid.
- Replace with a compatible solenoid, following the manual or manufacturer’s guidelines. Connect terminals properly.
- Reattach cables and terminals. Your lawnmower should now start smoothly.
2. Defective Ignition Switch
When the ignition button is engaged, it signals the starter circuit, triggering the solenoid. Ignition issues disrupt power distribution, hindering mower startup.
Diagnose by conducting an output voltage test with a multimeter, available at local electrical stores. Follow steps to assess ignition switch voltage.
- Activate the multimeter, linking its ground to the lawnmower’s battery negative terminal.
- Attach the multimeter’s positive terminal to the ignition switch’s starter terminal.
- Validate the voltage of the connected component once all entities are correctly linked.
- For lawnmowers with 12V batteries, the multimeter should display 12V; for 6V machines, it should read 6V. A lower reading indicates potential mower issues.
Repairing a Flawed Ignition System in Your Lawn Mower
If you observe a malfunction in the ignition system, replacing it is advisable. Ensure longevity by addressing the issue promptly. Fortunately, many lawnmowers, particularly riding mowers, feature a user-friendly ignition system replacement.
Alter the steps to switch on your lawn mower ignition by adhering to the instructions provided below.
- Extract the main battery fuse and turn off the lawnmower.
- Open the lawnmower’s hood and find the ignition.
- Press the tabs at the back of the ignition to remove it.
- Disconnect the old ignition, then connect and install the new one.
- Ensure compatibility by only using a suitable ignition switch for your lawnmower.
3. Defective Control Cable
The solenoid activation relies on the ignition sending current. The control cable plays a crucial role. Any damage renders it ineffective, necessitating replacement. Verify using a multimeter with these steps.
- Connect the multimeter’s negative side to your battery’s positive terminal and the positive side to the farthest cable from the ignition.
- Turn the ignition switch to start, noting the voltage reading. Any reading below the lawnmower’s battery voltage indicates a faulty cable.
- After diagnosis, proceed to the next section for the necessary fix.
Replacing Your Lawn Mower’s Control Cable: A Step-by-Step Guide
If your lawnmower is aging, it’s wise to swap the entire wiring harness. Easily replace the old one with the new; memorize the connection pattern for seamless reconnections.
If only the cable needs replacing, disconnect it from the wiring harness, and attach the new cable without adding complexity to the process.
4. Starter Circuit Terminals: Disrupted Links in Connection
In your starter circuit, numerous connections initiate the machine. A malfunction in any can hinder operation. Employ a multimeter to assess the starter circuit’s health, examining both incoming and outgoing power. A balanced voltage signifies a properly working mower; imbalances indicate component issues.
Repairing Starter Circuit Terminals for Improved Connectivity
Examine the circuit terminals to identify issues. Rectify loose connections and repair broken ones for the mower to function smoothly.
At times, terminal issues may not necessitate repairs; dirt and debris can impede performance. Using an electrical contact cleaner can effectively address this concern.
It’s crucial to disconnect the terminal before working to prevent accidents. Use the right tools: pliers, electrical contact cleaner, screwdrivers, a small socket wrench set, protective gloves, and a small wire brush.
Contrasts between Jump-Starting and Jump-Starting a Solenoid
Jumping the solenoid indicates a functional battery but a faulty solenoid. It’s an attempt to start with a defective solenoid. Conversely, a jump start is needed when the mower battery fails, and immediate machine use is required.
Hence, an additional battery is essential for kick starting the lawnmower, as it won’t function without one. Jump-starting is riskier than the solenoid method, not recommended due to potential mistakes leading to eye injuries or burns.
If you need to kick start your battery, use protective gear. Jump-start your mower only with a battery matching your lawn mowers voltage.
Conclusion
Defective solenoids and spark plugs often prompt the need to jump-start your lawnmower. This unconventional method is inconvenient, highlighting the urgency of repairing the mower promptly for a smoother, proper start.
Diagnose and resolve lawn mower issues swiftly with these tips. Begin by inspecting fuel and spark plug; then, seek professional help if problems persist.
Finally, it’s crucial to wear protective gear whenever operating your mower. Refrain from attempting repairs unless equipped with all necessary tools.